Pages

Saturday, February 19, 2011

The Winner of the $50 Gift Certificate!


The
     winner
                of
                   the
                       $50
                            Gift
                                  Certificate
                                               To
                                                  Black and White Apparel
                                                                Is
                                                          LeWalk

          Congratulations!
   I had a lot of fun with this giveaway!

Tuesday, January 25, 2011

My Dream Bedding!

So I found my dream bedding set for the bedroom!  The price range however is kind of in my Pottery Barn Dreams.....
   I have had something like this in mind for the past year.  I am hoping that I'll be able to knock this one off for say $40.00?!
My Bedroom is still  a ways off but when I get to it I will know exactly what I want to do with it!!

Thursday, January 20, 2011

Bedroom Wall Inspiration- Stripes and Tufting

I mentioned a little while back that my husband and I would be swapping rooms with our boys so they could have the master bedroom and a bigger place to play.

Last weekend we finally did it!  It was a really big feat because our house is tiny and moving a bunch of furniture around into different rooms caused a huge traffic jam!  For once I was grateful for the door that adjoins our bedroom and the boys bedroom.  We had to bring some of the furniture through there while OUR furniture sat in the front room :)

So while I am working on the kitchen and the work room OF COURSE I am thinking of something else completely :)  Our room is super small with our queen sized bed and tall dresser.  That is about all that fits.
In fact our bed is too big so we had to leave the footboard off of it so it would fit :)   So I am thinking of other alternatives with the bed and the walls.  I am probably going to boot the sleigh bed and make a BEAUTIFUL TUFTED headboard because now I have an excuse....

Don't worry!.....This is only in the planning stages because I have to finish my TWO house projects first :)
Since that was one of my goals for this year!

I love the shape of this headboard but probably wouldn't do it in white because it can't just be thrown in the wash when my kids fingerprints end up on it :)
Since our room is small but the walls are tall I thought some horizontal stripes would be amazing!
Creamylife.com


Maybe even some thicker stripes.  I love how it makes a long, narrow room look wider!
I am thinking in our bedroom I will do less browns and keep the blues and add more white and grays.
Maybe even a chandelier with a few crystals....hmmmm the wheels in my head are turning!

What would be your perfect bedroom?

I have given myself a time line on the kitchen....a week.  So next Thursday I should be done :)

Tuesday, January 18, 2011

Presenting a GIVEAWAY to celebrate the new dress line in my shop!

THIS GIVEAWAY IS OFFICIALLY CLOSED!
THE WINNER WILL BE ANNOUNCED TOMORROW!
Do you like to win things?  I know I do!

I am so excited to present the first two dresses ever in my Etsy shop that I am giving away.....

A $50 GIFT CERTIFICATE TO BLACK AND WHITE APPAREL!!!
The Ava Dress

Dainty pleats at the neckline and sleeves.
A Bubble hem and pleats at the waist for a little extra something special.

The Veronica Dress
Pretty spring flowers.
The fabric is light enough for spring and long sleeves keep you warm during those cooler beginnings of the season.
With a whimsy tie in the back...how can you resist?


To enter for my giveaway here is a list of options:
1-Log in to Facebook and type in Black and White Apparel LLC.  Once you are there click like and leave a comment.  It could be about your favorite item in my shop or something you would like me to put in my shop.   Sometimes I leave questions open on my wall to anyone who would like to answer them:)

2-  Log into Facebook and type in A Beautiful Cottage Home and click LIKE and then leave me a comment on my wall that let's me know what you like about my blog or what you would like to see on my blog....I love input.

3-You can also become a follower of A Beautiful Cottage Home on my blog and leave me a comment there as well.

4-Purchase something from my shop and leave me a message telling me you would like to be entered in my giveaway.

5- For every friend you get to "like" and leave a comment on Facebook you get an extra entry.
I've changed the rules....you can enter as many times as you like!   This means you can enter every day if you want!
 This Giveaway ends February 18, 2011

Good Luck!!


Monday, January 17, 2011

Another Kitchen Inspiration!

House of Turquoise had this lovely picture of the look I hope my kitchen will have...only smaller haha!
I especially love the butcher block countertops and have had my eye on some for my kitchen!
I also found an accessory that would look great by the window in my kitchen!!

I like it so much that I added it to my iphoto FOUR times!  Ha ha!


I have already talked to my Mom and she told me how to do it.......even has a container for me already!
I love how she always seems to have something similar on hand at all times!

Friday, January 14, 2011

A TIMER works like a charm- Cleaning Tip #10

I was up late last night trying to get my home in order after the kids were asleep.  They have been particularly destructive this week.....as they can be in the winter time.

I wanted to get a lot done but only had about an hour to do so.  So I set a timer for 10 minutes of scrubbing and picking up per room.  It was really easy to do because for ten minutes at a time all I had to do was focus on that one room.
Let me tell you......I got a lot done!
While the five minute clean sweep per room is great.....if you have a little more energy do ten minutes per room after the kids have gone to bed....You will be amazed at how much you can get done!!

Go try it and let me know how it goes!

Wednesday, January 12, 2011

Bedroom LOVE

I came across a picture of thenester's  (nester.com)  bedroom that she has recently redone.
It is so pretty!
The wooden floors add so much!
I love the fact that I have this very same sleigh bed purchased from Big Lots!  I have thought of painting it.....the white is so pretty!  By the way....
we will be switching our bedroom with the boys bedroom this week.  They get a bigger place to play and another set of bunk beds.  We get a smaller room, but hopefully less clutter from the boys having a bigger room.  Can't wait to show you once it's put together!

Obviously that will have to wait since I am organizing the work room AND being inspired with the kitchen!  Only 2 projects at a time...only two.  I'm trying to make that my mantra.

What do you think of all the white in this room?

Monday, January 10, 2011

My Work Room Inspiration With Window Mistreatment Tutorial and Decorative Bulletin Boards

 One of my New Years Goals for 2011 is to only have two projects going at the same time.  For me it is easier when I get stumped on the one project to go the other project until I am stumped there.

   ....Make sense?  Or is it justification?

Does ANYONE ELSE share the same point of view?
Before you see the following picture I'll warn you that it is graphic and EMBARRASSING!
So if you don't want to feel embarrassed for me then go now!
I'm a VERY straightforward person and show it like it is!

So my question for you is....
   do you have a room that always becomes the very last thing on your list?  This was mine a couple of days ago.  Still a work in progress.
My work room became this way during the holidays with bits and pieces of projects all over the place.

I knew that it would be impossible to come and work in here so I had to do something.  Don't laugh.....I went to the DI for inspiration.  I found this package of SIX bulletin boards for $3.00! They has some sort of glue on them, but I was going to cover them anyway.   I have been wanting some bulletin boards up in there to hang sketches and fabrics together so I could put things together in my mind with some new designs

This dresser was originally brown and I did it in bright turquoise with a glaze....I love how it turned out!  I painted the room orange and wanted to do turqoise and brown accessories with owls for my boys.  But then my work started taking over the house and driving ALL of us nuts!  That is how my work room came about.  So I will be decorating the room in those kid colors!
Our four boys now share a room and all they do is sleep there...so it works.  
I took this yucky window and wanted to do a window treatment to add some flair to this room.

I ripped down the heinous, breaking aluminum and started doing a window mistreatment.
Yes you heard right.  Not treatment, mistreatment.  Because it's actually cheating
I got the idea from thenester.com
She uses upholstery tacks, but nails were what I had on hand.

I started by taking some random curtains I had made a while back that were too wide, but just the right length.
Next I nailed the sides of the curtains to meet the edges of the window.  Then I found the middle and nailed that in place.
Then just add your box pleats until the fabric fits all the way across your window.


Your finished project should look something like this.  If you want to cover the nails then you could add pretty ribbon bows...OR just use upholstery tacks like thenester does.

To cover my bulletin boards I used Elmer's craft bond spray.
Make sure the surface you are using is wipeable because it really is sticky!
You will also need a glue gun and fabric scissors.

After spraying the back of the fabric I centered the bulletin board in place.
I also turned it around and pulled an smoothed the fabric so it wouldn't be too wrinkly looking.

Turn the sides in.  Don't worry if it isn't pretty because no-one will see the back when it's on the wall.

Pull the corners in so you have somewhat of a sharp corner when you are finished.

Now use your glue gun to secure any spots that won't stay.  I use low temp for the reason that I have children and the tendency to burn my self with any glue gun.  Immiediately after plugging it in my 3.5 year old decided to touch it....luckily all I had to do was wipe it off his finger real quick and he was fine.

After you have done all six boards in the package, arrange them the way you want them to look on your wall.  These are perfect here above my desk!

Excuse the bad hair day!  Using a level to make sure your first row of bulletin boards are straight, nail them in with a single nail.  I nailed mine in the center top section.

Now I have a focal paint when I come into my work room!  By making the window and desk area more beautiful I am determined to get every box in this room sorted!  I've already started!

This and......

This already look much better!
I will do a final post when it looks all put together in a couple of days!
It is Monday so I am off to deep clean my house and get some work done on my new dresses!
Stay Tuned!

Saturday, January 8, 2011

Progress on Kitchen- Part 3

I wanted to show you the progress on my kitchen so far even though I haven't gotten as far as I would like. Progress is progress right?
Of course I had to decorate it while I'm transitioning!
I rolled two coats of off white paint in a nice gloss so it will be scrubbable.
I also did not use a drop cloth because I can just peel the paint off the linoleum.
.....drop cloths have never worked for me....especially cheap, plastic ones because they stick to my feet.

Doesn't it look so much brighter already!!?  It already feels like a new space with the white.
.....now to find the saw that goes to my miter box to finish this.
Ah, life with four kids.....sometimes I wonder if I know where my brain is! Hee hee!

Here is what I did to get this far.
I took a regular paint brush and did the edges.  If you do this be quick about it so that you don't get paint lines because it dried before you got to it with the roller.  Having two people to do it at once would be awesome!  You don't even need to go all the way up to the line because that line will be covered by the wide board that goes on top of board and batten.

I had to show you where I had to just paint around the already painted over outlet.  I got my screwdrivers out and tried to get it out to no avail.   The screw was WAY too stripped to get out because it's so old!  I'll let my husband take care of this one :)
I don't know who in their right mind decides to paint over a piece of plastic thinking it will look good!?

The gloss that I used is by Olympia and is waterbased.  I wouldn't have used this brand normally because it is $28.00 a gallon, but the paint guy who mixed it chose the brand of paint.....be sure to watch those paint guys to make sure your supposed thrifty project doesn't become expensive.  I'll be using this paint for all of my trim now....every drop!!

I painted this problem area under the window just in case you can see under the board at certain angles....since you cannot get it completely flat.

This will end up looking smooth when it's done....especially if I use some wall putty and sandpaper.

Old houses are interesting how they crack all over the place.

My attempt to cover the heinous air conditioner....that we should probably remove since it is 8 degrees outside.

B decided he must be in the picture.  I feel like this is looking much brighter after two coats of paint.  I can hardly wait to add the boards!
Until next time......

Tuesday, January 4, 2011

Progress on Kitchen- Part 2

Nasty Wall before everything started.  That air conditioner is coming out and the blinds are coming down!!
This wall is going to be brightened up!  On with it!

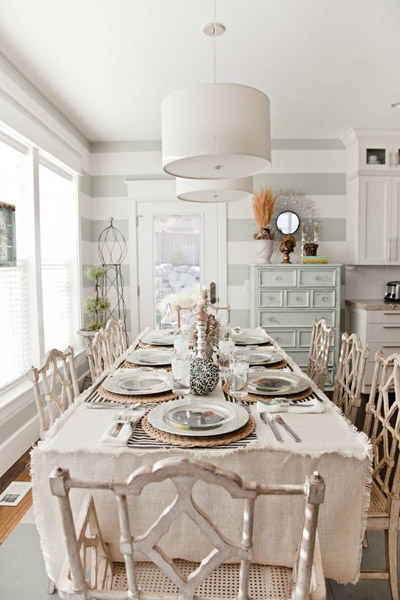
My kitchen inspiration for the cabinets
My walls will look similar to this as the paint in my kitchen is dark like this.  It is called Warm Caramel.
Love how the white brightens up the space!!!
If you missed my first post a while back on what I have done so far go here
http://abeautifulcottagehome.blogspot.com/2010/09/sneak-peakcabinet-redo.html

I was wondering how I might decide on how high I wanted the board and batten to come in my kitchen
I think I have the magic number figured out......50 3/4" from the ground.
......odd but there is a reason.


I KNOW that I want to extend the board and batten into the family room adjoining the kitchen because it would look better to have it continue into other parts of the house.....I'd be insane to not to continue the
sophistication into the next room!

TANGENT... so back to the reason I chose that random number.  I went into the family room and found any light outlets or funny things that would get in the way of the board and batten.  Since our house was built in 1912, something has been added by every.single.owner. just to add to the charm that our house is.

One of those charms are oh.....a nice, UGLY door to the circuit breaker that can't be covered even by paint......and......wait for it
......on the wall behind the entertainment center!   FABULOUS HUH?
This will look great when it's done after the kitchen :)  Don't mind the mismatched touch up paint around the light switch.....lesson learned- don't ever do touch up paint when you are tired...sometimes you put the wrong color on...haha


So to help cover that up I brought the board and batten measurement all the way underneath it so that I can set a little picture on the shelf of the board and batten AND COVER UP THE MONSTROSITY that is the circuit breaker door.
This was before I started painting the outside of the drawer.....I have two more coats to go and contact paper to put in the bottom.  I want my cabinets to be pretty inside and out!


So far I have pulled out two drawers and started to paint the inside of them, gone and bought a ton of supplies and am waiting for the energy to ATTACK this project.
.........I think I have a holiday hangover....even though I don't drink:)

I put two coats of thin white paint on the drawers and FINALLY found white contact paper for the inside of the drawers because BOY ARE THEY U.G.L.Y.
We will be putting an extra board along the bottom of the window to make it more even because the plaster is cracking under the window seal.  Then we'll build around it with the board and batten.


All that junk in the open shelf is supplies for this project.  I already started putting the beadboard wallpaper up.

This side of the kitchen I am not quite sure what to do with the upper cabinets because they are so unattractive.  In the spring this flooring is going....so excited!  Think knotty laminate :)

We don't really use the fan much and I am craving some real shelfs or a pan rack above the stove.....any ideas?

I will be adding beadboard wallpaper to the sides of the cabinets for some added flair.


A better picture of the crack and groove under the window seal that will be hidden.
Pretty plain huh?  It will be stinkin' cute when I get done with it....in a month!

On the up side the worse the before the better the after right??

Have you painted your kitchen cabinets?  How long did it take you?

I think I might have to recruit a couple of friends to have a painting party to get this done!!
The Nester (thenester.com) recruited some lovely ladies to slip cover her entire sectional for her.....I think my odds might be pretty good :)